Table of Contents
Want to change your oil for the first time, and you’re not sure what to do? Changing your own oil is an intimate process that solidifies the bond between the car and the car owner. Don’t worry, you don’t have to be a rocket scientist to change your own oil, but it does take a bit of know-how and a fair amount of elbow grease. In this article, we’ll break down the step-by-step process of changing your oil so you can confidently handle it.

Save money and do the job right
If you decide to change your oil at home, you can certainly save some money and have peace of mind knowing that the job was done well. Getting this job done at an auto repair shop isn’t exactly cheap, and depending on how much you drive, it could be something you need to get done multiple times per year, and that adds up quickly. The money you save can be put towards quality oil that your engine will thank you for. Do yourself, your vehicle, and your wallet a favor and try an oil change on your own next time.
Are you ready to get your hands dirty?
Right off the bat, if you’re not willing to get your hands (and clothes) dirty, lay on the floor, have little flecks of unknown particulate matter fall on your face, and swear a few times, then maybe you should just take it to your local mechanic. But if all of that sounds like fun to you, then you might have what it takes to change your own oil. In addition to a gung-ho attitude, you’ll need a few tools, such as a new oil filter, a set of wrenches, jack stands, and more.
Selecting the right motor oil for your vehicle
You might be thinking that all motor oil is the same, but then you get to the store, and you see all the options. What are all these letters and numbers? It’s like 50 quarterbacks all calling an audible at once. SAE 10W-50. SAE 30. Synthetic. API. 5W-20. Conventional. SN/CF. 15W-30. Hut! Hut! Hike! And… you just got sacked.
Don’t freak out! While we won’t go into extreme detail in this article, just know that the different numbers refer to the oil’s viscosity, or thickness. Your vehicle’s engine craves a particular viscosity, so make sure to give it what it wants. Choosing the best motor oil means finding one that meets your manufacturer’s specifications for viscosity and performance. You can find what particular type (or types) of motor oil your engine wants by consulting your car owner’s manual in the “recommended lubricants” section. This will also tell you if your engine should take synthetic oil or conventional oil (sometimes called mineral oil).
How to change car oil overview: tools and materials
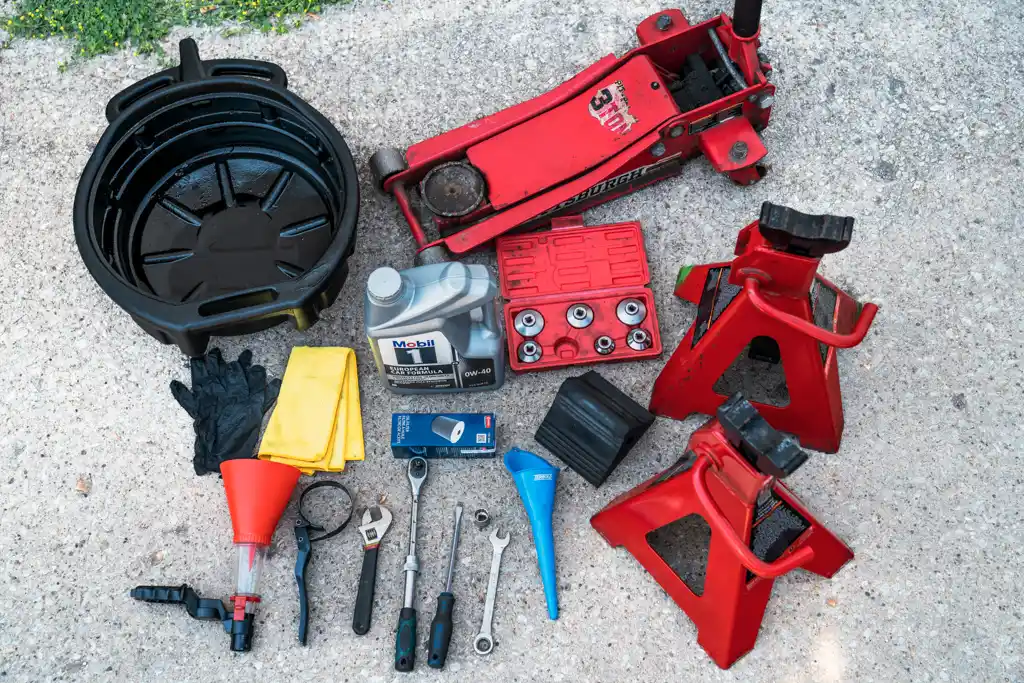
Before you get started, you’re going to need some tools and materials.
- New oil: Many places sell motor oil, including gas stations or auto parts stores. Remember, check your owner’s manual and purchase the correct viscosity oil.
- New oil filter: It’s not 100% necessary to change your oil filter every time you change your oil (manufacturers recommend every other oil change at a minimum), but it’s kind of silly to run brand-new oil through an old, dirty filter.
- A car jack and jack stands: Make sure you have two jack stands. Follow the safety instructions for using these items carefully.
- Wrench set or socket wrench
- Oil filter wrench: You might be able to get by without this particular item, but it definitely will make your life easier regardless.
- Oil drain pan: This item is used to catch the oil that comes pouring out of your engine. You can buy a purpose-made oil pan, but many people use a DIY item such as a plastic tub. Just make sure it won’t leak, and it should have a large opening; it can be hard to tell where exactly the oil is going to go when it comes spilling out, so an old beer can is not going to cut it. If you want to look like a pro, then take an old oil carton, Screw the cap on tight, lay it on its side, and cut away the “face” of the carton. Make sure it’s a big one because once the oil starts coming, there’s no good way to stop it.
- Paper towels: This is bound to get a bit messy. Use something you don’t mind throwing away after because that old oil stain is NOT going to come out.
- A funnel: This makes pouring the new oil into the reservoir hassle-free.
- Gloves: Put some gloves on unless you want to have black oil embedded in your fingerprints for the next five to seven business days.
Before you get started
Before you get started, take a look at your old oil. Pull the engine oil dipstick and see what your current oil level is. If it is quite low, this could be a sign that your engine oil leaks, which is a whole separate issue you’ll want to address.
You should also take a moment to note the color of your old oil and see if there is any visible particulate matter in it. This will give you a clue as to just how far you’ve pushed your oil. If it’s black as midnight and low, you might want to replace your oil sooner next time and/or consider replacing your oil filter.
Step-by-step oil change instructions
Step 1. Warm up the engine a little bit
If your engine is cold, it’s a good idea to run the engine for a few minutes to loosen everything up. This will make the oil flow faster, and it’s more likely that all the oil will drain out rather than stick to some parts of the engine. It also helps the used oil to pick up particulate matter that might be swirling around the engine or stuck in certain places. You don’t need to go careening down the highway for an hour; turn it on and let it run in the driveway for 5-10 minutes.
Step 2. Engage parking brake
Make sure it’s engaged with the parking brake, the emergency brake, the E-brake, or whatever you want to call it. You’re about to crawl underneath your car. The last thing you want is for it to start moving.
Step 3. Jack it up and place the jack stands underneath
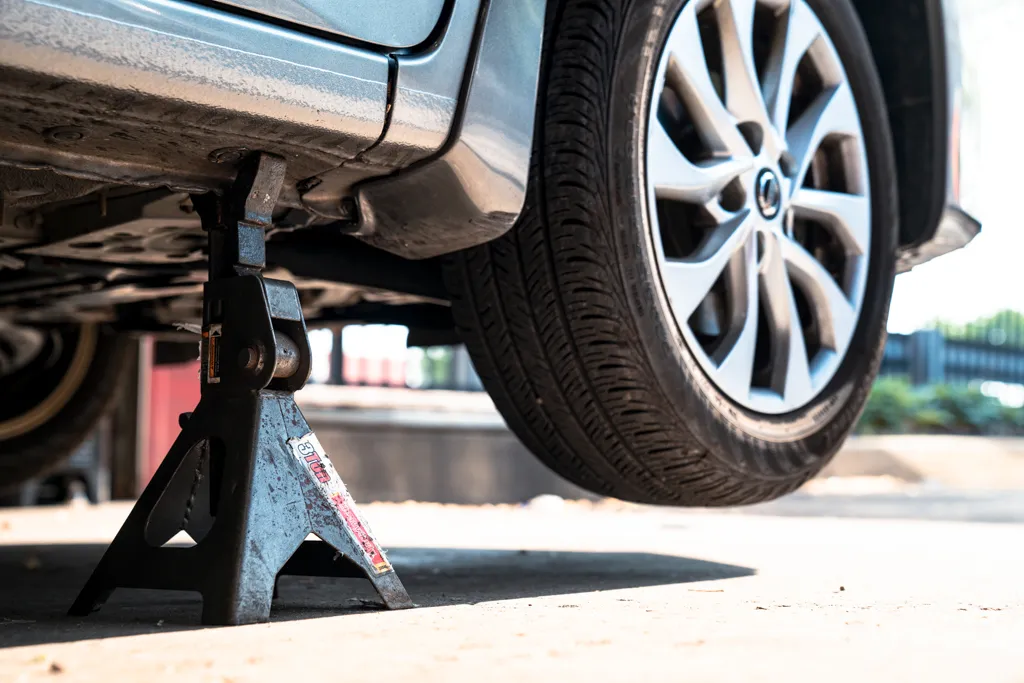
Use the car jack to house the car to an appropriate level. WARNING: Do NOT get under the car with only the jack to keep it in place. This is not safe. Use the jack stands, two of them, underneath the car to keep it up safely. You could also use ramps. Make sure to engage the emergency brake once you’ve got it up on the ramps. Whether you’re using jack stands or ramps, a final safety precaution should be to use wheel chocks behind the wheels to make sure it doesn’t roll. A 2×4 brick or large rock will work in a pinch if you don’t have wheel chocks.
Step 4. Locate the drain plug and the oil filter
Usually, both of these items will be under the car, but sometimes cars will have the oil filter on top. Take a moment to locate both of these things before you get any further. If your car has a dust cover or engine guard, you’ll obviously need to remove this first.
Step 5. Remove the oil filter
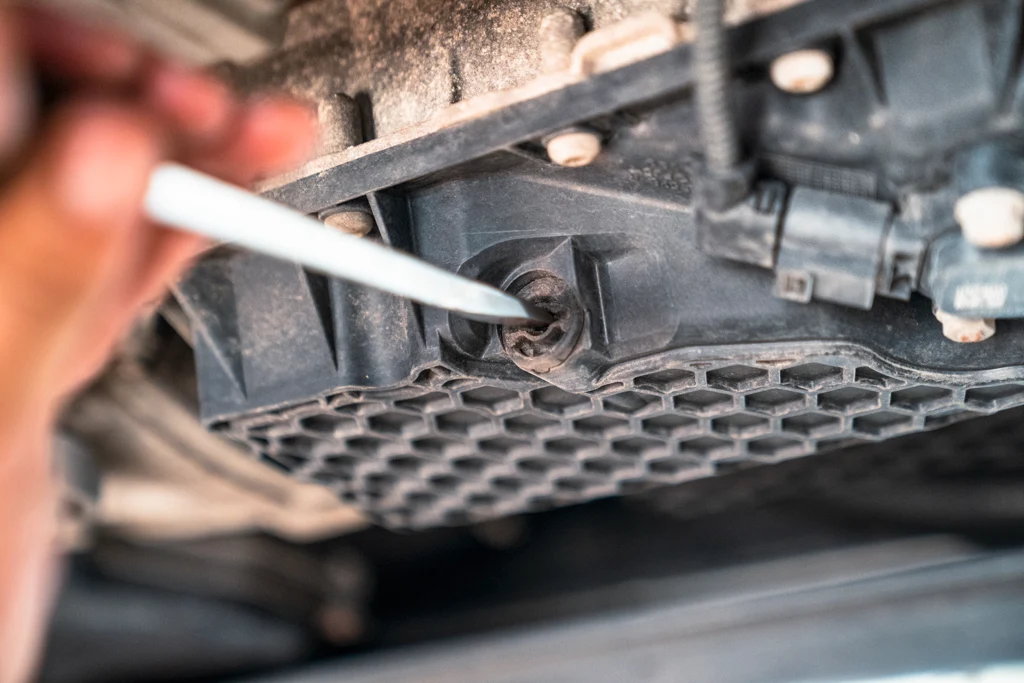
Use the oil filter wrench to wrap around the oil filter. Then turn it until it comes loose. Once it has come loose, it should be easy to remove with your hands. Pro tip: Clean your oil filter wrench with a towel or rag if it keeps slipping. If it’s still slipping, you can use an old belt or a piece of sandpaper on the inside of the wrench to give it extra traction.
Why remove the filter first?
This is a source of some contention in the world of mechanics. Some say to remove the oil filter before draining the oil, and some say to do it after you drain the oil. Classic chicken or the egg dilemma. We recommend removing the oil filter first for two main reasons:
- Oil filters can be slippery sons of guns. You don’t want to drop the oil filter into your oil pan, which will be filled with hot oil if you do that first.
2. It’s better to focus on one task at a time. Removing the oil filter while the oil is draining could result in your lack of attention and some unnecessary spillage.
Step 6. Get your oil pan in position
First, get your oil pan in position. Don’t put it directly under the drain plug. The oil will come “shooting” out at an angle, so account for this. As the oil level gets lower, the flow will decrease, and it won’t go as far, eventually slowing to a drip directly below the drain plug. This is why your oil drain pan is recommended to be a tub or something with a huge mouth.
Step 7. Remove the drain plug, drain the oil
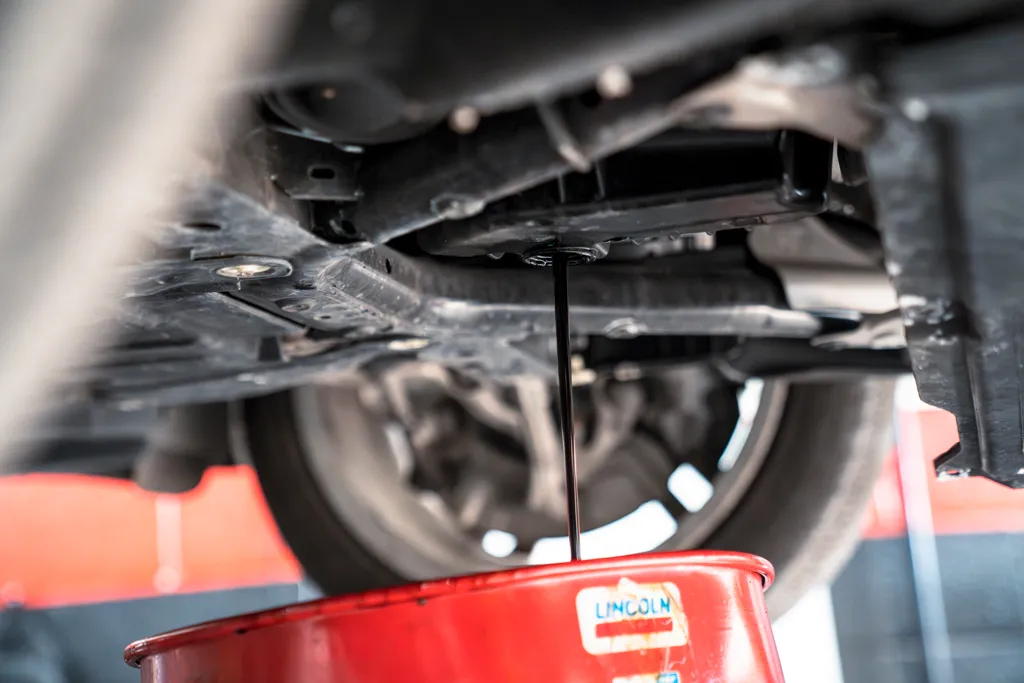
Using a wrench or socket wrench, remove the drain plug. This will let the oil drain out automatically. Gravity does all the work. Just watch to make sure it’s going neatly into the drain pan. It is possible to loosen the drain plug and unscrew it by hand; this will prevent the plug from flying, but you’ll also get some oil on your hands. I hope you remembered those gloves! If you don’t catch the oil drain plug, don’t worry. It’s not a big deal. You’ll need to go fishing around through the oil, looking for it. This is mildly humbling, but no one needs to know. Congrats, you are halfway finished with your first oil change.
Step 8. Return the drain plug
Let the oil drain completely out (usually about a minute or so), and then replace the drain plug. Simply insert it back into the plug hole, being mindful of the drain plug gasket. Make sure to line up the oil drain plug threads so that it goes in smoothly. Make sure to tighten it using the wrench and not just by hand, but don’t go crazy because you’re gonna need to get it off again in a few months. If you notice that the drain plug is starting to become stripped, the threads are wearing out, or the gasket seems damaged, you can find a replacement drain plug at any auto parts store for a few dollars.
Step 9. Put the new filter on
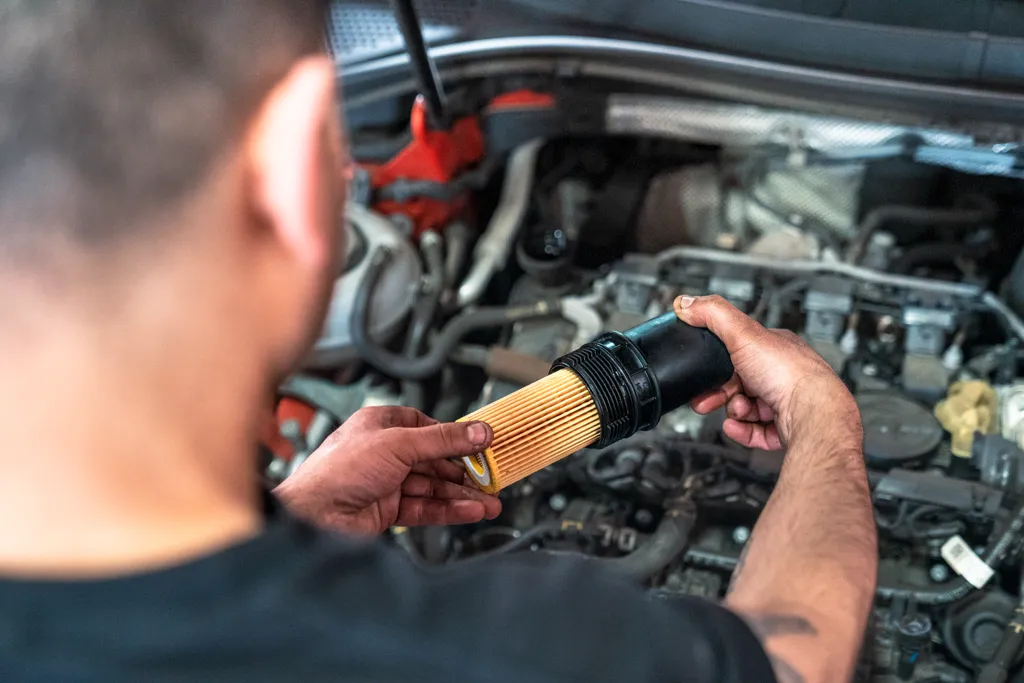
Take your shiny new filter out of the oil filter box. Fill the oil filter with some new oil using the funnel. Also, work some of the oil around the oil filter gasket to create a tighter seal. Filling the new filter with oil will prevent the engine from running dry for the first few minutes while the new motor oil works its way around. But this is not necessary or even possible as some oil filters are mounted sideways or upside down in the engine. Put the filter back on and tighten it just like the drain plug.
Step 10. Fill the engine with oil
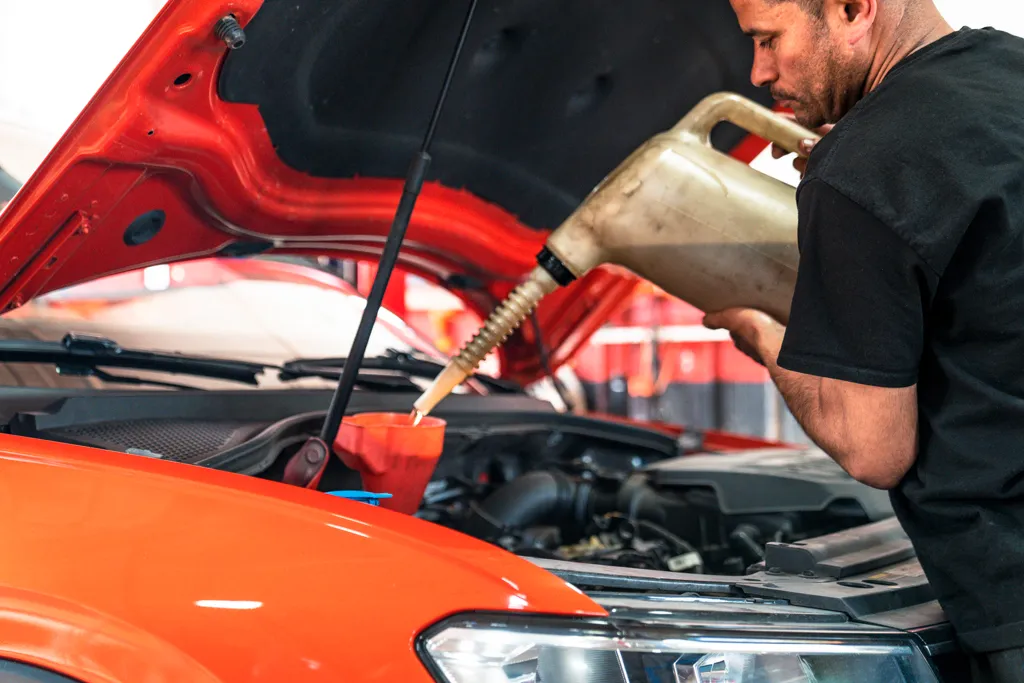
You’re almost done! Search underneath the hood for the oil fill cap. It will most likely have an image of an old-timey oil can on it and will be directly on top of the engine. Unscrew the oil cap and insert the funnel. Now pour the new oil into the engine. When you’re done, remove the funnel and replace the oil cap, screwing it on by hand.
Step 11. Check the oil level, check for leaks
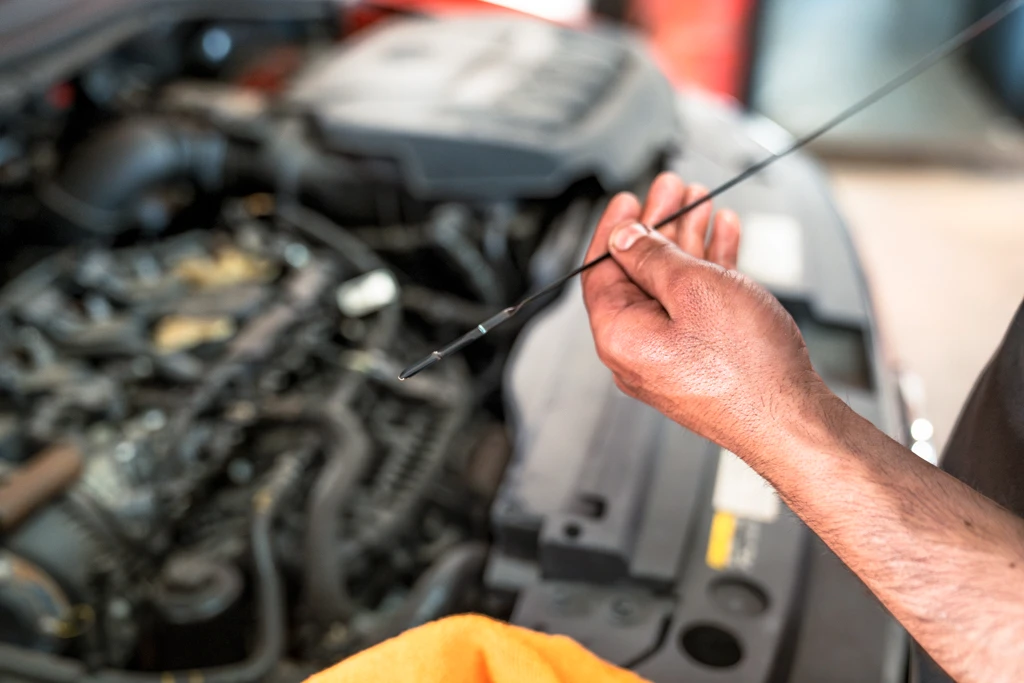
Run the engine again for about 5-10 minutes, just like you did at the beginning. This will allow the oil to circulate around the engine, fill the new filter if you haven’t already, and generally let it settle in. They cut the engine and let it cool off for about 5 minutes. Once this is done, remove the dipstick and check the oil level. If it says that your oil is low, check underneath the car to ensure you have no leaks. The most likely spot would be the oil drain plug. Adjust for any leaks and then add some more oil and check the level again. Once that is done, lower the car off the jack stands so it’s firmly on level ground. Check the oil one more time just to be sure that it’s good now that everything is level again. At this point, you can give yourself a pat on the back. You’ve just finished your first oil change. Feels good, don’t it?
Frequently Asked Questions
How often should I change my oil?
The old rule of thumb is every 3,000 miles, but newer vehicles and new oil technology can push this to about 6,000 miles or even further to 10,000 miles. The best way to find out would be to routinely check your oil level and condition and consult with a local technician to make sure. It’s time to start thinking about an oil change when it starts to look ugly.
Is synthetic oil better than conventional oil?
It’s not better, exactly, but it does last longer. Synthetic oils don’t break down as easily as conventional oils, so that you can move further between oil changes. However, synthetic oil tends to be more expensive, so it’s up to you to crunch the numbers and figure out which is better for your car and your budget.
How should I dispose of my old oil after an oil change?
This is a great question. In many places, it is illegal to dump old motor oil, so avoid the temptation to dump it down the drain, throw it in the trash or pour it out into the backyard. It is highly toxic and devastating to wildlife and waterways. You might not be aware of this, but motor oil can be recycled almost indefinitely. A simple way to dispose of it is to pour it right back into the bottle of new oil you just purchased, screw the cap on tight, and bring it to your local recycling center. You can store multiple bottles of motor oil like this in a cool, dry place.